Daily Maintenance of Chicken Coops with Mortise-and-tenon Structures
- Leo liu
- Apr 25
- 8 min read

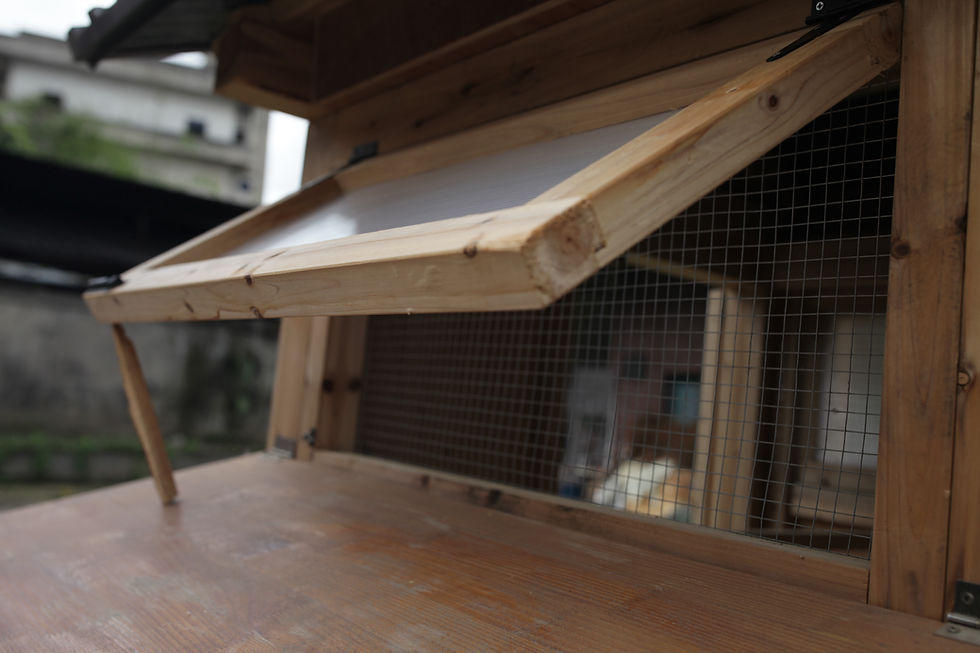
The mortise-and-tenon structure is a testament to the wisdom of Chinese carpentry. Chicken coops constructed using this technique require neither nails nor screws; they rely solely on the interlocking grooves and protrusions between the wood pieces for secure fastening, resulting in both durability and flexibility. Many poultry farmers who appreciate traditional craftsmanship often commission or build such mortise-and-tenon coops themselves, placing them in their courtyards—serving not only as a home for the chickens but also as aesthetically pleasing wooden structures. However, the mortise-and-tenon system has its own vulnerabilities—it is particularly sensitive to the moisture content of the wood and fluctuations in environmental humidity. Improper maintenance can cause the tenons to loosen or the mortises to crack, leading to instability or even collapse of the entire coop. Below, I will outline the key principles for daily maintenance of mortise-and-tenon chicken coops, point by point.
1. Understanding the "Breathing" Mechanism of Mortise and Tenon Joints: Wood Is Mobile. Before maintaining a chicken coop, you must grasp a fundamental principle: solid wood is dynamic. In humid conditions, the wood expands by absorbing moisture, thickening the tenon and narrowing the mortise, thereby tightening the joint; in dry conditions, the wood contracts, thinning the tenon and widening the mortise, causing the joint to loosen or even detach. The longevity of mortise-and-tenon structures—often lasting centuries—lies in this "elasticity": they allow wood to expand and contract without completely collapsing, provided the expansion and contraction remain within the design allowances. If the coop is outdoors, repeated cycles of extreme expansion during summer rains and contraction under heating or direct sunlight in winter will lead to permanent loosening of the joints. Therefore, the primary maintenance principle is to maintain stable temperature and humidity levels. Avoid locations exposed to direct sunlight, water accumulation, or proximity to boilers or air conditioning units. In dry indoor environments during winter, place a basin of water to increase humidity; during prolonged rainy summers, enhance ventilation or use fans to dry surfaces.
II. Daily Inspections: Three daily checks and one semi-monthly inspection. For the mortise-and-tenon chicken coop, it is advisable to develop the habit of daily observation. When feeding the chickens each day, simultaneously: 1) check the roof for any obvious deformation or settlement; 2) inspect the junctions between the four corner posts and beams for gaps exceeding the thickness of two coins; 3) examine the floor frame base for warping or localized subsidence. If any mortise protrudes from its mortise hole—even by just two to three millimeters—this should be taken seriously.
Perform a more thorough inspection every two weeks. You can manually shake the entire chicken coop frame—stand diagonally and gently shake it. A healthy mortise-and-tenon chicken coop should remain completely immobile, exhibiting only minimal elasticity at most. If you notice a distinct creaking sound during shaking or if the frame moves several centimeters in any direction, it indicates that at least one set of tenons has loosened. In such cases, locate the issue along the direction of movement; typically, the tenon at the longest crossbeam or near the door frame is worn out.
III. Tightening Technique: Tap Back Instead of Forcing In What to do if the tenon has withdrawn? Never strike the tenon directly with a hammer, as this will split the wood. The correct method is: place a thick, flat piece of hard wood against the end surface of the tenon, then tap the wood block with a wooden hammer or rubber hammer to gradually return the tenon to its position. If it cannot be inserted, this indicates that there is debris in the mortise or the wood has deformed; do not force it in. First, remove any surrounding dust and bird droppings, gently sand the tenon surface with fine sandpaper, apply a small amount of soap or paraffin for lubrication, and then attempt insertion again.
If the tenon has completely loosened and cannot be secured by hammering, a "wedge-in" method is required. Find a dry, thin piece of wood (bamboo is also acceptable), shape it into a wedge, apply wood glue, and gently hammer it into the gap between the tenon and mortise. Be careful not to hammer too deeply; leave a small portion exposed, and once the glue has dried, smooth it out with a planer or sandpaper. This method is reversible; when disassembly is needed later, the wedge can be removed without damaging the original tenon and mortise joint.
IV. Moisture Prevention is Critical: Preventing Wood from "Absorbing Excessive Water" The greatest concern for mortise-and-tenon chicken coops is water exposure. When wood absorbs water and expands, the joints become overly tight, generating internal stresses that may cause joint cracks or joint fractures. Therefore, waterproofing and moisture prevention are paramount. The coop foundation must be at least 10 to 15 centimeters higher than the surrounding ground; ideally, a concrete platform should be constructed or a layer of bricks laid before placing the coop on it. The coop's base frame must never be directly embedded in muddy ground.
The roof must be absolutely leak-proof. For mortise-and-tenon chicken coops, lightweight waterproof materials such as resin tiles or color-coated steel sheets are recommended; excessively heavy tiles should be avoided. The eaves must extend sufficiently (at least 30 cm) to prevent rainwater from wetting the front wall panels. Annually, before and after the rainy season, inspect the joints between the roof and the wooden frame for any signs of water leakage.
Moidity control within poultry houses is equally crucial. Clean manure daily and replace bedding weekly to maintain dry floors. If green or black mold appears on a wooden panel, it indicates excessive moisture content. Remove the mold with a dry cloth, dry it with a hair dryer, and apply a thin layer of wood wax oil. If the mold has penetrated deep into the wood, sand off the blackened layer with fine sandpaper, bleach with hydrogen peroxide, and finally seal with oil.
5. Regular Oil Application: Protecting Wood with a "Raincoat" Both the exterior and interior surfaces of the mortise-and-tenon chicken coop (excluding the roosting frames and egg-laying box floors that chickens directly contact) should be regularly coated with wood wax oil or tung oil. Tung oil is a traditional method that penetrates deeply into wood fibers, providing waterproofing and pest resistance, and is completely harmless to chickens once fully dried. Wood wax oil is a more modern option, forming a breathable film with a pleasant texture. Regardless of the choice, it is advisable to apply the coating twice annually: once before winter begins and once after the rainy season ends.
Before applying the oil, thoroughly clean the wood surface. Use a hard-bristled brush to remove loose dust and chicken manure residues; if there is oil contamination, wash with mild soap water, then allow it to dry completely. Apply the oil evenly to the wood using a cotton cloth or brush, paying special attention to areas prone to water ingress such as all end surfaces, exposed tenon joints, and around mortise openings—these areas require an extra coat. Allow 20 minutes to half an hour for the oil to absorb, then wipe off excess oil with a dry cloth to prevent dust accumulation. After oil application, the wood surface will exhibit a slight gloss; when water is poured on it, water droplets will roll off—this indicates that the "raincoat" effect has been achieved.
Note: Do not apply excessive oil to the inner bottom plates of the perch and egg production boxes, as this may cause slippery surfaces for chickens and lead to啄ing at the oil film. These areas should be kept dry and polished smooth.
6. Pest and Ant Control: Protect Your Joint Structures from Termites. Joint structures are particularly vulnerable to termite damage. Termites crawl from underground, begin feeding at the base of the frame, and can travel along the wood grain all the way to the roof, turning the joints into a honeycomb-like structure. Preventive measures include digging a shallow trench around the chicken coop foundation and applying lime powder or specialized termite powder (be careful to prevent chickens from ingesting it). Inspect the base of the frame and column roots every six months; use a screwdriver to probe the area—if the powder easily penetrates and falls out, it is highly likely termite or termite-infested insects. For minor infestations, inject kerosene or a specialized insecticide into the infested areas using a syringe, then seal the openings with putty. In severe cases, the affected wood must be removed and replaced—this demonstrates the advantage of joint structures: they allow localized repairs without compromising the integrity of the entire structure.
Additionally, chickens naturally consume small insects, which provides auxiliary protection against pest infestations. However, one should not expect them to eliminate termites entirely. Maintaining cleanliness around the poultry house and avoiding the accumulation of old wood, dead branches, or fallen leaves can significantly reduce pest populations.
7. Dealing with Wood Cracking: Minor Cracks Can Be Left Unaddressed; Major Cracks Require Reinforcement. Complete prevention of solid wood cracking is difficult, especially after years of use. Minor cracks (no wider than one millimeter) do not affect the structure and need not be addressed; the oil applied may even seep into and fill the cracks. However, if the crack exceeds two millimeters in width and extends through most of the cross-section of a tenon or beam, it must be repaired. A common method is reinforcement: drill several small holes on either side of the crack, fill them with wood glue, insert bamboo sticks or thick cotton ropes, and then secure the crack from the outside with clamps until the glue dries before releasing. Another method is the "butterfly tenon": create a dumbbell-shaped groove along the crack and insert a similarly shaped piece of hardwood to seal the crack like a butterfly. This requires some carpentry skill but yields excellent results.
It is particularly important to note that if a crack appears at the root of the tenon, it indicates that the tenon is about to fracture. In such cases, promptly install a support bracket beneath the tenon or use a stainless steel corner bracket for reinforcement (although this compromises the integrity of the entire tenon-joint, it ensures safety).
8. Seasonal Maintenance Calendar: You can schedule maintenance tasks for the chicken coop according to the seasons. Spring: Conduct a thorough inspection of the coop's roof tiles and joints, remove fallen leaves from the drainage channels, and apply a coat of tung oil or wood wax oil. Summer: Focus on moisture and mold prevention; during sunny weather, open doors and windows frequently for ventilation, and use electric fans to dry damp corners when necessary. Autumn: This is the season when mortise and tenon joints are most prone to loosening, as wood contracts after sudden drying following summer expansion. Inspect each joint individually, tighten any loose parts, and reinforce them with wedges. Winter: In northern regions, prevent cracking by maintaining humidity by placing a basin of water inside the coop; in southern regions, guard against dampness and cold by regularly replacing the bedding to avoid condensation.
The final heartfelt words describe the mortise-and-tenon chicken coop as a dialogue between humans and wood. Unlike iron-nail structures that are "coarse," this design becomes increasingly warm and durable with proper care—even passing down through generations. A daily routine—glancing at and shaking the coop while feeding the chickens, applying oil before and after the rainy season, and promptly addressing minor issues—requires only a few hours annually. In return, you gain a sturdy, aesthetically pleasing coop that retains the warmth of wood itself, along with a flock of happy hens living within this "work of art." Remember: Treat the mortise-and-tenon joints well, and they will serve your chickens well for a lifetime.


Comments